Snowflake Schema V3
Load data from Data Platform to Snowflake
From AWS S3 V2
Pre-requisites
- Have Dreamdata's data platform AWS S3 destination enabled (go to this blog to enable it if you haven't!)
From now on,
<S3_BUCKET> refers to the bucket name used in Dreamdata's data platform AWS S3 destinationConfiguring the Snowflake storage integration
This section is based on snowflake's documentation, which is already very complete.
- Create an S3 storage integration (Snowflake)
CREATE STORAGE INTEGRATION <S3_INT>
    TYPE = EXTERNAL_STAGE
    STORAGE_PROVIDER = 'S3'
    ENABLED = TRUE
    STORAGE_AWS_ROLE_ARN = '<AWS_ROLE_ARN>'
    STORAGE_ALLOWED_LOCATIONS = ('s3://<S3_BUCKET>')
From now on, <S3_INT> refers to the storage integration created above - Fetch AWS credentials created by Snowflake as part of the storage integration (Snowflake)
DESC INTEGRATION <S3_INT>;

-- Find AWS IAM User ARN under STORAGE_AWS_IAM_USER_ARN
-- Find AWS External ID under STORAGE_AWS_EXTERNAL_ID
From now on,<STORAGE_AWS_IAM_USER_ARN>will be usedFrom now on,<STORAGE_AWS_EXTERNAL_ID>will be used - Create an AWS Role (AWS)From now on,
<AWS_ROLE_ARN>refers to the ARN of the newly created role - Create an AWS S3 policy that allows access to the S3 bucket (AWS)
{
  "Version": "2012-10-17",
  "Statement": [
    {
      "Effect": "Allow",

      "Action": [
        "s3:GetObject",
        "s3:GetObjectVersion"
      ],
      "Resource": "arn:aws:s3:::<S3_BUCKET>/*"

    },
    {
      "Effect": "Allow",
      "Action": [
        "s3:ListBucket",
        "s3:GetBucketLocation"
      ],
      "Resource": "arn:aws:s3:::<S3_BUCKET>"
    }
  ]
} - Attach the policy created in (4) to the role created in (3) (AWS)
- Only allow
<STORAGE_AWS_IAM_USER_ARN>to assume the role created in (3). To do so, change role's trusted policies to (AWS){
"Version": "2012-10-17",
"Statement": [
{
"Effect": "Allow",
"Principal": {
"AWS": "<STORAGE_AWS_IAM_USER_ARN>"
},
"Action": "sts:AssumeRole",
"Condition": {
"StringEquals": {
"sts:ExternalId": "<STORAGE_AWS_EXTERNAL_ID>"
}
}
}
]
}
Load the data
- Define the variables that we will need
-- vars
SET BUCKET = '<S3_BUCKET>';
SET STORAGE_INT = '<S3_INT>'; - Parse the receipt file
SET RECEIPT_FILE = 'receipt.json';
SET RECEIPT_URL = concat($BUCKET, '/', $RECEIPT_FILE);

CREATE OR REPLACE STAGE receipt
    STORAGE_INTEGRATION = $STORAGE_INT
    URL = $RECEIPT_URL
    FILE_FORMAT = (TYPE = JSON);

CREATE OR REPLACE TEMPORARY TABLE receipt AS
SELECT
  key AS table_name,
  $BUCKET || '/' || value:folder AS folder,
FROM
  @receipt,
LATERAL FLATTEN(PARSE_JSON($1):tables); - Create a stage per table found in the receipt
CREATE OR REPLACE PROCEDURE STAGES()
RETURNS string
LANGUAGE JAVASCRIPT
EXECUTE AS CALLER
AS
$$
    try {
        // Define your SQL statement
        var sqlStatement = "SELECT TABLE_NAME, FOLDER FROM receipt";

        // Execute the SQL statement
        var stmt = snowflake.createStatement({sqlText: sqlStatement});
        var rs = stmt.execute();

        // Get the URL value from the result set
        var url = "";
        var stage = "";
        while (rs.next()) {
            stage = rs.getColumnValue("TABLE_NAME");
            url = rs.getColumnValue("FOLDER");

            // Build the CREATE STAGE statement
            var createStageStatement = "CREATE OR REPLACE STAGE " + stage + " " +
                                       "STORAGE_INTEGRATION = s3_int " +
                                       "URL = '" + url + "' " +
                                       "FILE_FORMAT = (TYPE = JSON)";

            // Execute the CREATE STAGE statement
            stmt = snowflake.createStatement({sqlText: createStageStatement});
            stmt.execute();
        }
            return "stages created successfully"
    } catch (err) {
        // Raise an error message if any exception occurs
        throw "Error creating stages: " + err.message;
    }
$$;

CALL STAGES();
SHOW stages; - See the data
SELECT * from @attribution parse_json($1);
SELECT * from @companies parse_json($1);
SELECT * from @contacts parse_json($1);
SELECT * from @events parse_json($1);
SELECT * from @spend parse_json($1);
SELECT * from @stages parse_json($1);
From Microsoft Azure Storage
Pre-requisites
- Dreamdata Microsoft Azure Storage integration set up and configuration validated. Data should be present in your Storage container.
- A Snowflake account.
- Sufficient permissions in your Microsoft Azure organisation to:
- Give consent to Snowflake to access your Microsoft Storage Account and Container.
- Assign a read-only role to the Snowflake Service Principal for the Storage Container used to integrate with Dreamdata.
Set up loading of data from Microsoft Azure Storage to Snowflake
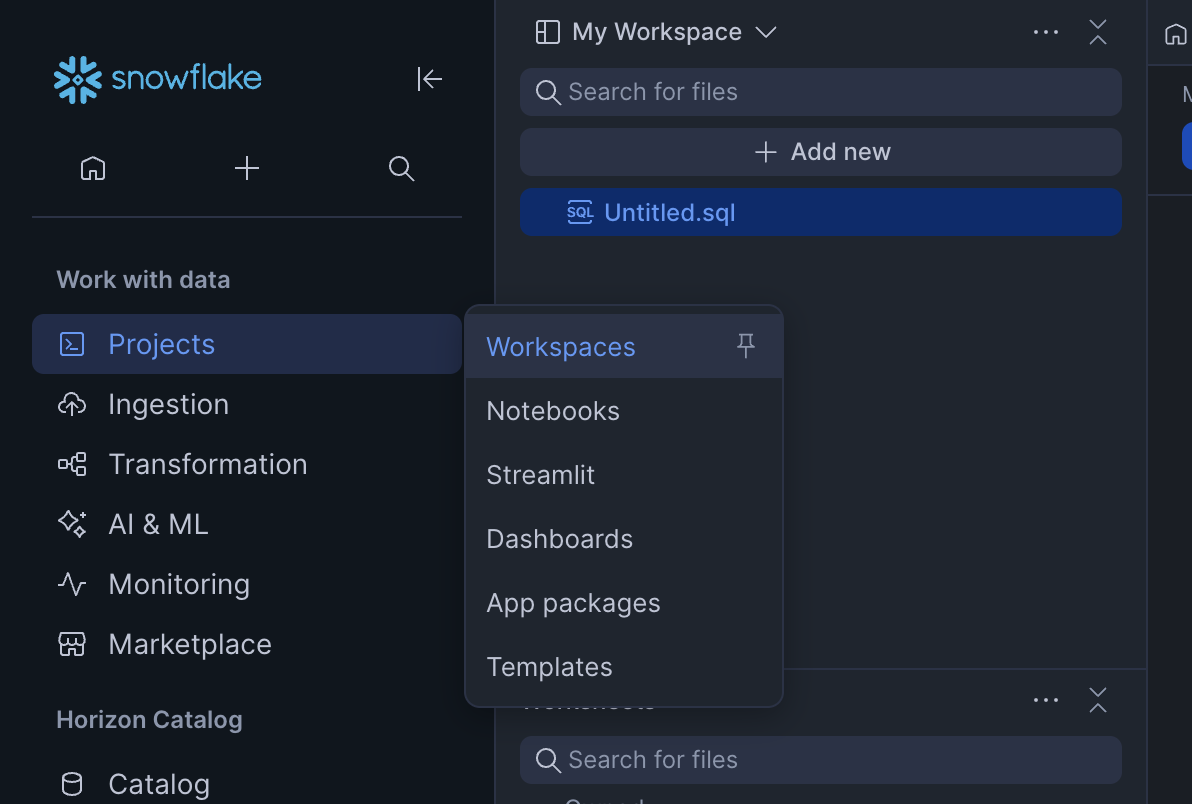
- Log into your Snowflake account and select Projects -> Workspaces. Then click on '+ Add new' if a new Untitled.sql file is not created for you automatically.
- Copy and paste the following SQL snippet into the SQL file editor in the Snowflake workspace, replacing the values highlighted below:
CREATE OR REPLACE WAREHOUSE DREAMDATA_WAREHOUSE
Make sure to fill in the following values:
WAREHOUSE_SIZE = 'XSMALL' -- Compute instance size.
AUTO_SUSPEND = 60
AUTO_RESUME = TRUE;
CREATE OR REPLACE DATABASE DREAMDATA_DB;
CREATE OR REPLACE STORAGE INTEGRATION dreamdata_azure_integration
TYPE = EXTERNAL_STAGE
STORAGE_PROVIDER = 'AZURE'
ENABLED = TRUE
AZURE_TENANT_ID = '<AZURE_TENANT_ID>'
STORAGE_ALLOWED_LOCATIONS = ('azure://<AZURE_STORAGE_ACCOUNT_NAME>.blob.core.windows.net/<AZURE_STORAGE_CONTAINER_NAME>/');
-- Get integration details
DESC STORAGE INTEGRATION dreamdata_azure_integration;<AZURE_TENANT_ID>- This is your organisational Microsoft Azure Tenant ID.<AZURE_STORAGE_ACCOUNT_NAME>- This is the Storage Account name used to integrate with Dreamdata.<AZURE_STORAGE_CONTAINER_NAME>- This is the Storage Container name used to integrate with Dreamdata.
Optionally change the value ofWAREHOUSE_SIZEto match your computing needs. - Execute each statement individually (macOS: CMD + RETURN, Windows: CTRL + ENTER).
- When you execute the final command, you will get a result set, containing integration details like the following. Click on (or copy and paste into a browser) the
AZURE_CONSENT_URL. Also, make note of theAZURE_MULTI_TENANT_APP_NAME.ENABLED
Boolean
true
false
STORAGE_PROVIDER
String
AZURE
STORAGE_ALLOWED_LOCATIONS
List
azure://
<AZURE_STORAGE_ACCOUNT_NAME>.blob.core.windows.net/<AZURE_STORAGE_CONTAINER_NAME>/[]
STORAGE_BLOCKED_LOCATIONS
List
[]
USE_PRIVATELINK_ENDPOINT
Boolean
false
false
AZURE_TENANT_ID
String
21b00000-0000-0000-0000-000000000f
AZURE_CONSENT_URL
String
https://login.microsoftonline.com/
<AZURE_TENANT_ID>/oauth2/authorize?client_id=0d940384-0ddc-4872-8ee0-18d87d96a2c7&response_type=codeAZURE_MULTI_TENANT_APP_NAME
String
odxje2snowflakepacint_000000000000000
COMMENT
String
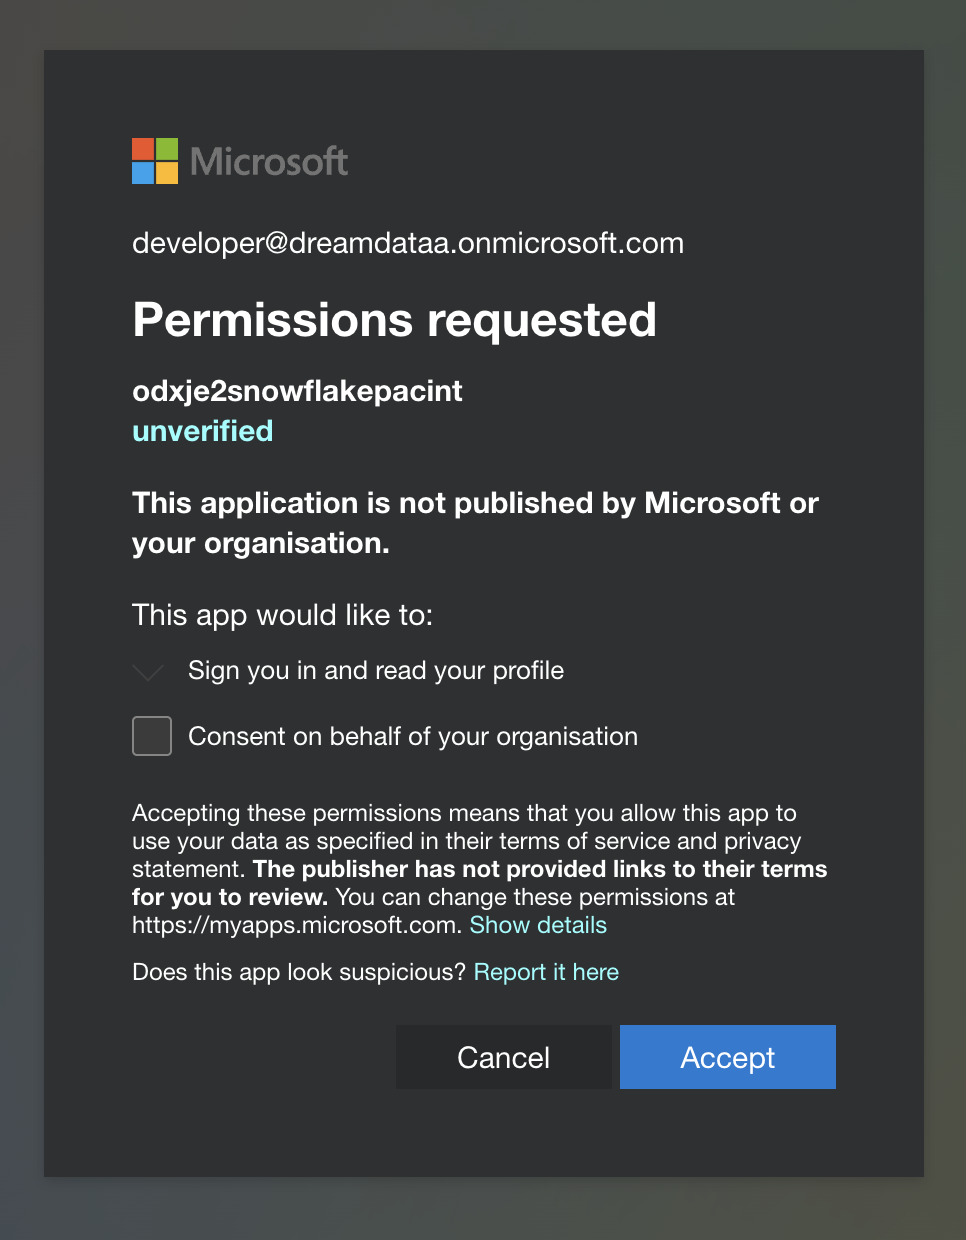
- When prompted to give consent to Snowflake, click 'Accept':
- Next, Snowflake's Service Principal needs to be given access to your Azure Storage Container. To do so, in Microsoft Azure Portal, follow these steps:
- Navigate to your Storage Account.
- Navigate to your Storage Container inside your Storage Account:


- Select the Access Control (IAM) property pane - example:
dreamdatadatawarehouse:
- Click the 'Add' menu and select 'Add role assignment':

- From the list of roles, select either the
Storage Blob Data Readerrole.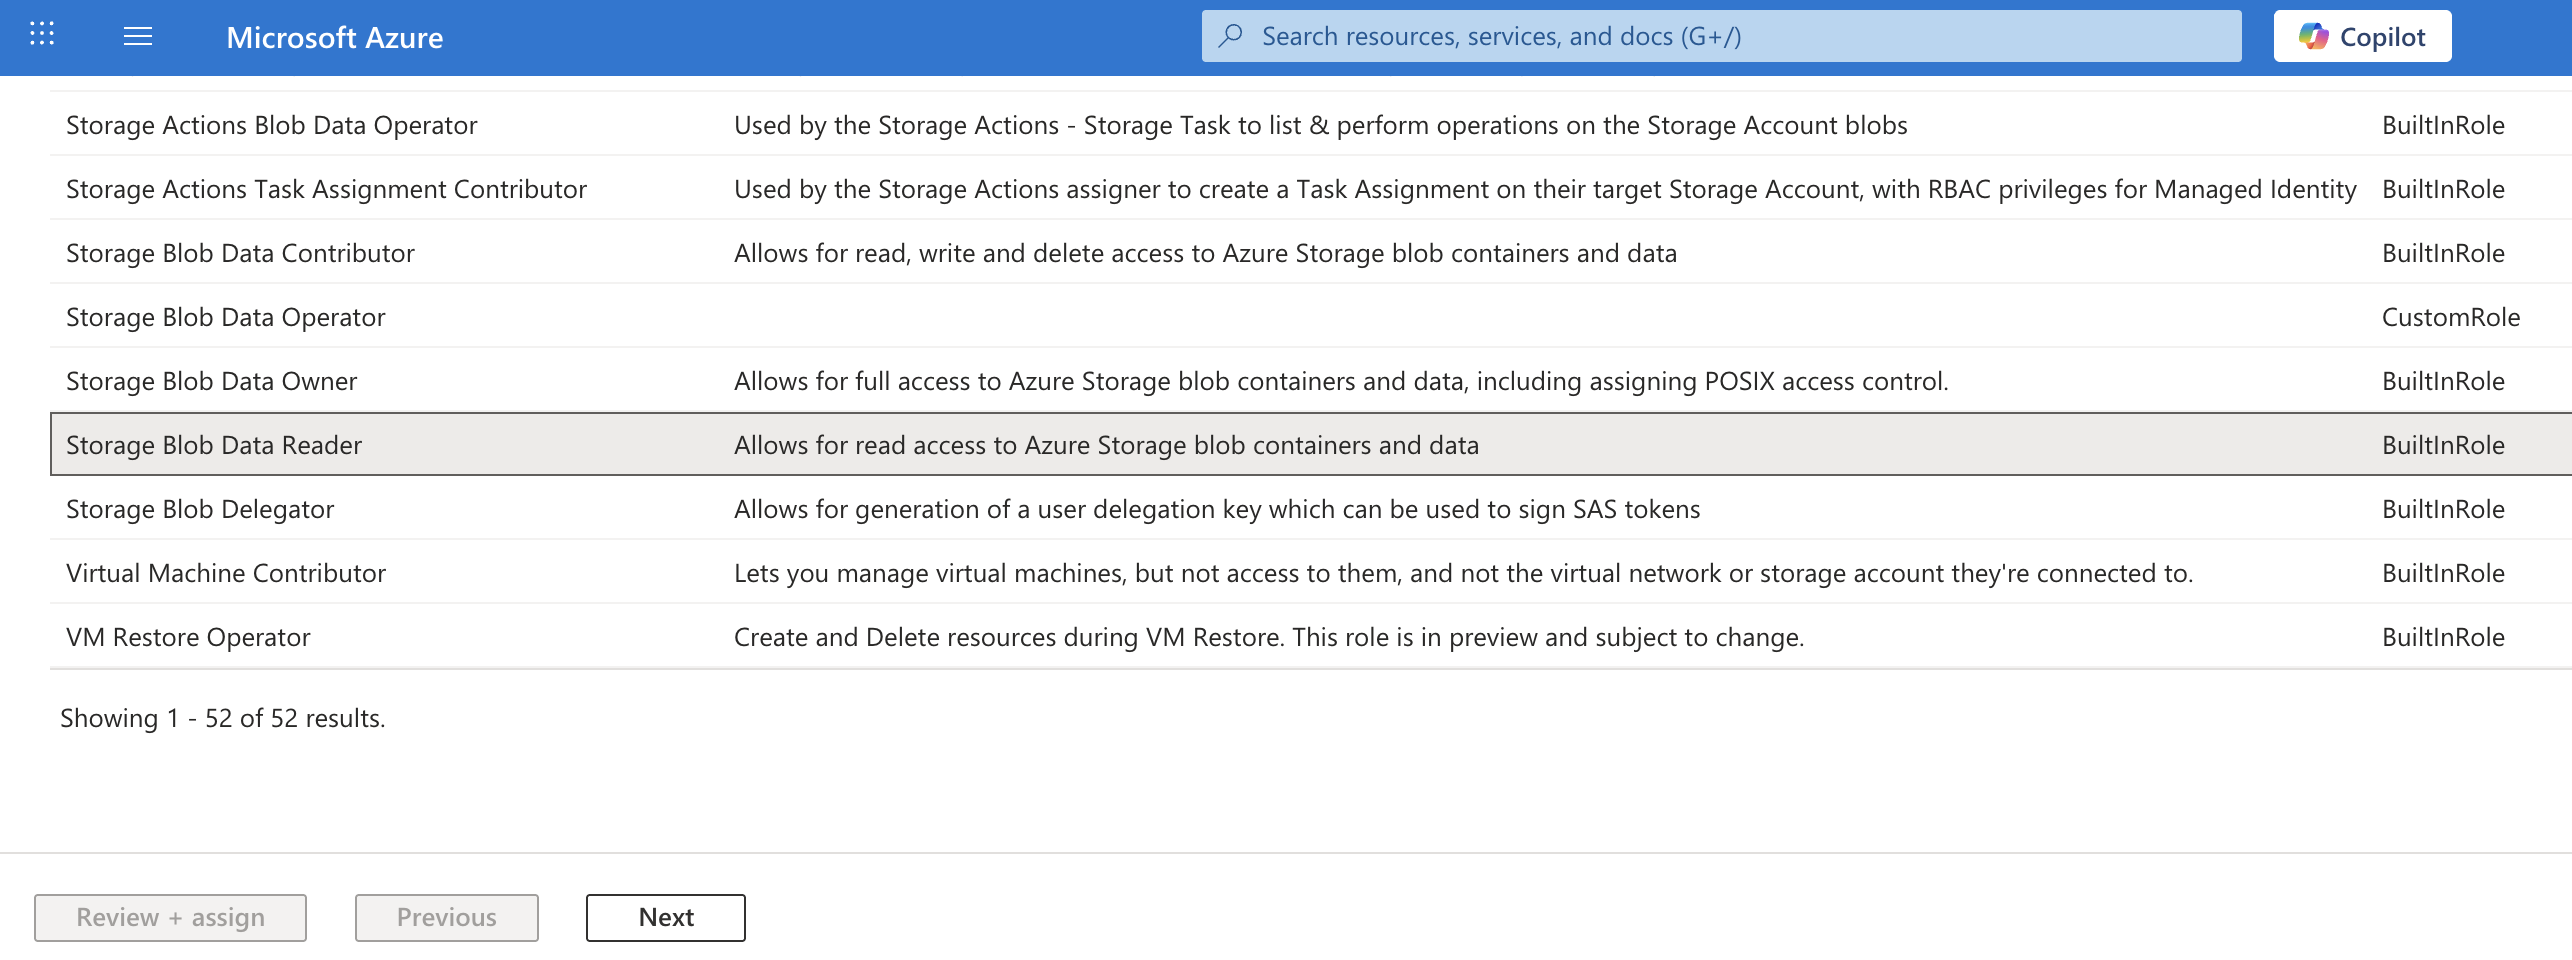
- Click on 'Select Members' and in the Search box that pops up, type in the
AZURE_MULTI_TENANT_APP_NAME.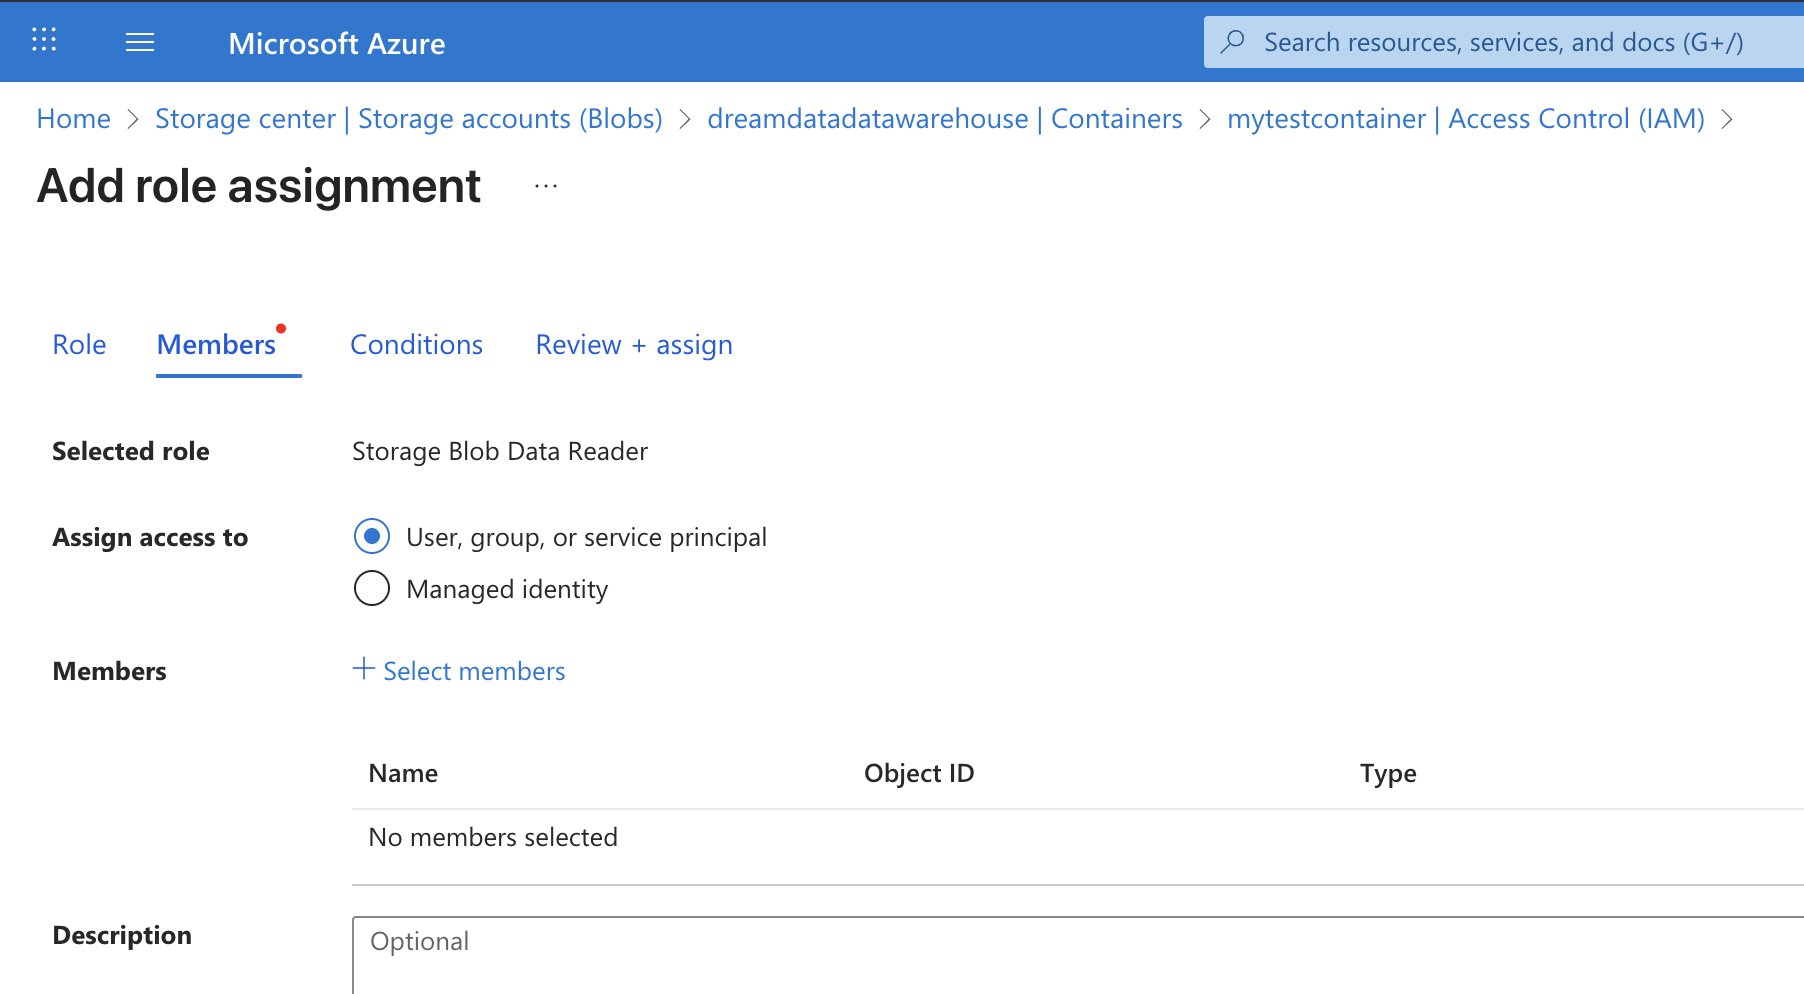
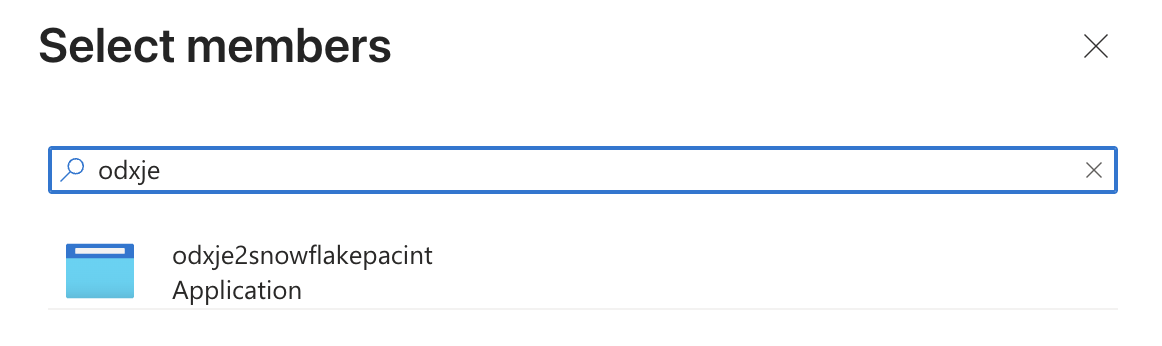
- Click on the application and press on the 'Select' button:
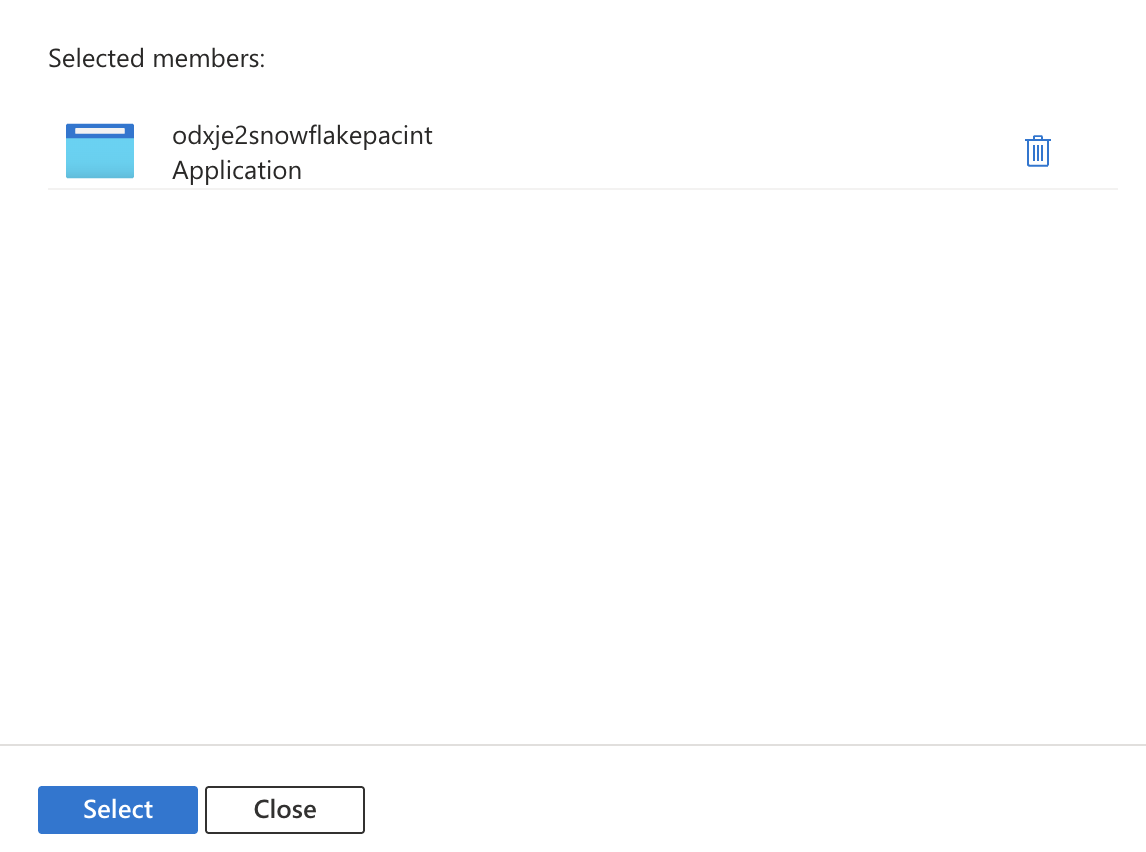
- Click on the 'Review + assign' button twice:
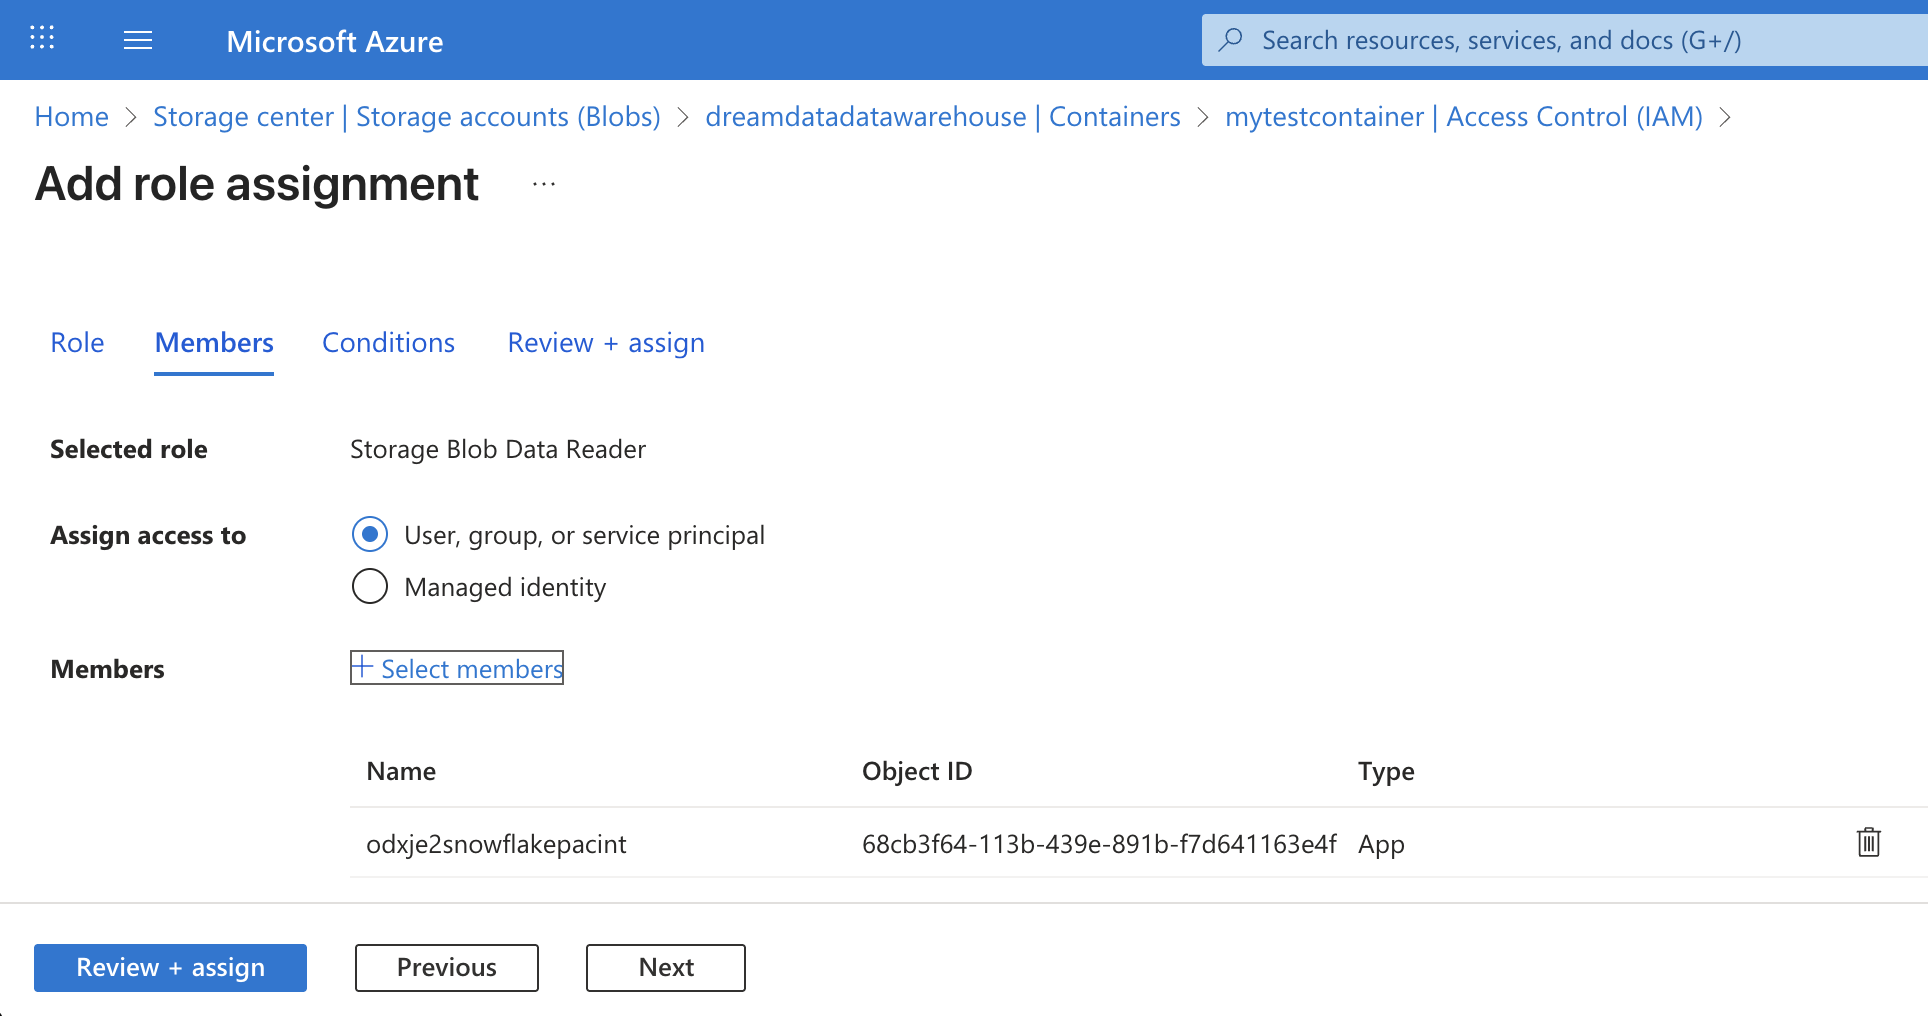
- You should now see the role assigned to the Dreamdata Data Warehouse App (Service Principal):

- Append the following snippet to the above script, again replacing
<AZURE_STORAGE_ACCOUNT_NAME>and<AZURE_STORAGE_CONTAINER_NAME>with the real values corresponding to your account:CREATE OR REPLACE PROCEDURE SP_LOAD_LATEST_EXPORT()
This completes the setup stage for loading data from Azure Storage into Snowflake.
RETURNS VARCHAR
LANGUAGE SQL
AS
$$
DECLARE
c1 CURSOR FOR SELECT KEY::STRING, VALUE:folder::STRING FROM receipt_content_temp, LATERAL FLATTEN(input => raw_json:tables);
log_output STRING DEFAULT 'Starting ELT on-demand load...\n';
table_name STRING;
folder_path STRING;
copy_command STRING;
transform_command STRING;
BEGIN
CREATE OR REPLACE TEMPORARY TABLE receipt_content_temp (raw_json VARIANT);
COPY INTO receipt_content_temp FROM @dreamdata_azure_stage/receipt.json FILE_FORMAT = (FORMAT_NAME = 'format_ndjson');
OPEN c1;
FOR record IN c1 DO
table_name := record."KEY::STRING";
folder_path := record."VALUE:FOLDER::STRING";
log_output := log_output || 'Processing table: ' || table_name || '\n';
-- STEP 1: LOAD raw data into the staging table
TRUNCATE TABLE RAW_LANDING_ZONE;
copy_command := 'COPY INTO RAW_LANDING_ZONE(RAW_DATA) FROM ''@dreamdata_azure_stage/' || folder_path || ''' FILE_FORMAT = (FORMAT_NAME = ''format_ndjson'');';
EXECUTE IMMEDIATE copy_command;
-- STEP 2: TRANSFORM data from staging into the final production tables using INSERT OVERWRITE.
-- This safely wipes the previous data and replaces it atomically in a single step!
CASE (table_name)
WHEN 'companies' THEN
transform_command := 'INSERT OVERWRITE INTO COMPANIES SELECT RAW_DATA:dd_company_id, RAW_DATA:domain, RAW_DATA:all_domains, RAW_DATA:account_owner, RAW_DATA:properties, RAW_DATA:custom_properties, RAW_DATA:source_system, RAW_DATA:audiences, RAW_DATA:row_checksum FROM RAW_LANDING_ZONE;';
WHEN 'contacts' THEN
transform_command := 'INSERT OVERWRITE INTO CONTACTS SELECT RAW_DATA:dd_contact_id, RAW_DATA:email, RAW_DATA:properties, RAW_DATA:source_system, RAW_DATA:custom_properties, RAW_DATA:companies, RAW_DATA:audiences, RAW_DATA:row_checksum FROM RAW_LANDING_ZONE;';
WHEN 'events' THEN
transform_command := 'INSERT OVERWRITE INTO EVENTS SELECT RAW_DATA:dd_event_id, RAW_DATA:dd_session_id, RAW_DATA:event_name, TRY_TO_TIMESTAMP(RAW_DATA:timestamp::STRING, ''AUTO''), RAW_DATA:quantity, RAW_DATA:dd_visitor_id, RAW_DATA:dd_contact_id, RAW_DATA:dd_company_id, RAW_DATA:dd_tracking_type, RAW_DATA:dd_event_session_order, RAW_DATA:dd_is_primary_event, RAW_DATA:event, RAW_DATA:session, RAW_DATA:source_system, RAW_DATA:signals, RAW_DATA:stages, RAW_DATA:row_checksum FROM RAW_LANDING_ZONE;';
WHEN 'spend' THEN
transform_command := 'INSERT OVERWRITE INTO SPEND SELECT TRY_TO_TIMESTAMP(RAW_DATA:timestamp::STRING, ''AUTO''), RAW_DATA:cost, RAW_DATA:impressions, RAW_DATA:clicks, RAW_DATA:adNetwork, RAW_DATA:channel, RAW_DATA:source, RAW_DATA:ad_account, RAW_DATA:ad_hierarchy, RAW_DATA:context, RAW_DATA:source_system, RAW_DATA:row_checksum FROM RAW_LANDING_ZONE;';
WHEN 'stages' THEN
transform_command := 'INSERT OVERWRITE INTO STAGES SELECT RAW_DATA:dd_stage_id, RAW_DATA:stage_name, RAW_DATA:dd_object_id, RAW_DATA:dd_company_id, TRY_TO_TIMESTAMP(RAW_DATA:timestamp::STRING, ''AUTO''), RAW_DATA:value, RAW_DATA:primary_owner, RAW_DATA:journey, RAW_DATA:dd_primary_contact_id, RAW_DATA:object_contacts, RAW_DATA:custom_properties, RAW_DATA:source_system, RAW_DATA:stage_transitions, RAW_DATA:row_checksum FROM RAW_LANDING_ZONE;';
WHEN 'attribution' THEN
transform_command := 'INSERT OVERWRITE INTO ATTRIBUTION SELECT RAW_DATA:dd_stage_id, RAW_DATA:dd_session_id, TRY_TO_TIMESTAMP(RAW_DATA:timestamp::STRING, ''AUTO''), RAW_DATA:quantity, RAW_DATA:dd_visitor_id, RAW_DATA:dd_contact_id, RAW_DATA:dd_company_id, RAW_DATA:dd_tracking_type, RAW_DATA:dd_is_primary_event, RAW_DATA:stage, RAW_DATA:session, RAW_DATA:source_system, RAW_DATA:attribution, RAW_DATA:row_checksum FROM RAW_LANDING_ZONE;';
END CASE;
EXECUTE IMMEDIATE transform_command;
log_output := log_output || ' -> Successfully overwritten and transformed table: ' || table_name || '\n';
END FOR;
CLOSE c1;
RETURN log_output;
END;
$$; - Initiate the loading of data from your Azure Storage account by appending and executing the following statement. This is the only command which needs to be executed whenever data is to be updated, on-demand.
CALL SP_LOAD_LATEST_EXPORT();
