Form tracking: Calendly

In this article, we'll provide you with an extensive description of how you can track your Calendly meetings e.g. demo bookings into Dreamdata, and how you can use the data within your customer journey.
Gating the Calendly form
As you would maybe gate an ebook with a form asking users to give their name, email, and company for you to send them this unique content, you might want to consider doing the same with your Calendly form.
Let's say you want your prospects to be able to book a demo. The straightforward way of doing this would be to create a basic form on your website asking the user for the information you would typically ask about, such as name, email, and company.
If you use the Dreamdata auto-identify script, we will automatically identify the users and associate the anonymous cookie id with the submitted email. Read more about form tracking here.
After the users have submitted the basic form, you have multiple options:
Redirect to Calendly
Right after the form submits, you might redirect users to a page where they see the Calendly form, or you might want to first validate the user's email and via the email share the next page.
If you decided to send the user directly to the Calendly URL, you might want to pass the user's information directly in the calendly UR:, such as email, to avoid having the user enter the same information twice.
This can be done in the email you send to the prospect or if you would want to redirect the user directly to the Calendly link.
https://calendly.com/YOUR_LINK/30min?email=john@doe2.com&first_name=John&last_name=Doe
If you decide to use the method and would want to track the Calendly scheduling as a conversion or how it's a critical tracking point for you in the customer journey, we recommend combining it with Zapier as described further down in this article.
Redirect to embed form
You might also send the user to an embedded version of the Calendly form on your website.
It has the advantage that you track when the user submits the Calendly form directly in the browser using a post message.
window.addEventListener("message", function(e) {
  if(e.origin === "https://calendly.com" && e.data.event && e.data.event.indexOf("calendly.") === 0) {
    analytics.track("form-submit");
  }
});
If you use the embed method, you might want to prefill some of the information the user has already given.
window.analytics.ready(function() {
    var name, email = '';
    if (window.analytics.user().traits().name)
        name = window.analytics.user().traits().name;
    if (window.analytics.user().traits().email)
        email = window.analytics.user().traits().email;
    var aId = window.analytics.user().anonymousId();

    window.Calendly.initInlineWidget({
        url: 'https://calendly.com/YOUR_LINK/30min',
        name: name,
        email: email,
        utm: { utmContent: aId }
    });
});
Questions & Answers
Q: Why not just directly embed the Calendly form on your website?
A: It is possible to embed a Calendly form on your website, and your users might find that very easy. Unfortunately, Calendly does not have many advanced options for sending information back to the parent page on who scheduled a time, which gives you a limited possibility of linking the entire user journey with the known user.
Zapier or Webhooks
Both Calendly and Dreamdata have a Zapier integration. With the combination of these, you can track all Calendly schedules and ensure you track and identify the user within Dreamdata. You might, also use Calendly webhooks and Dreamdata server-side APIs and implement this yourself if you prefer.
For this method to work as well as the gated version it's essential you are able to pass information to the Calendly form that helps Dreamdata associate the user's anonymous session with the Calendly booking. In the gated version, this happens with the user's email address, here it will happen by parsing in the user's anonymous id first to the Calendly form and then later to Dreamdata in Zapier or your Webhook.
In the example below, we use the utm_content parameter to send in the user's anonymous id when loading the embedded Calendly form. We rarely see utm_content being used, it's up to you to select the UTM parameter you don't use for other purposes.
window.analytics.ready(function() {
var aId = window.analytics.user().anonymousId();
window.Calendly.initInlineWidget({
url: 'https://calendly.com/YOUR_LINK/30min',
utm: { utmContent: aId }
});
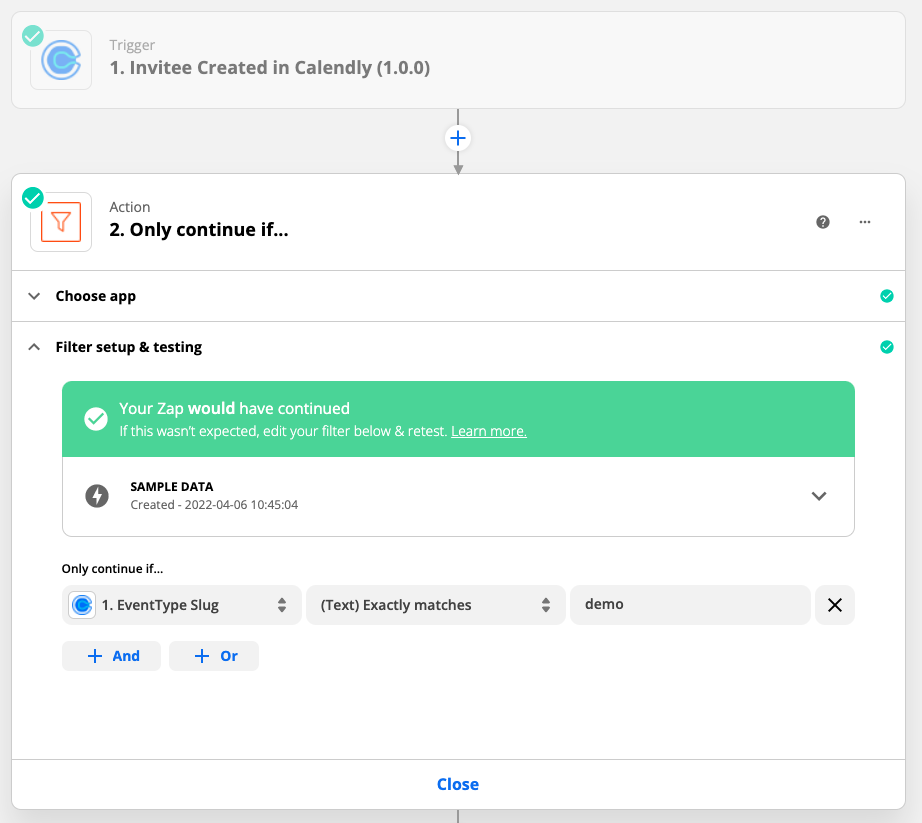
});When you set up Zapier you first want to decide if you want to track all your Calendly forms to Dreamdata or only a selected few.
See the example screenshot here of how you might filter by Calendly event type.
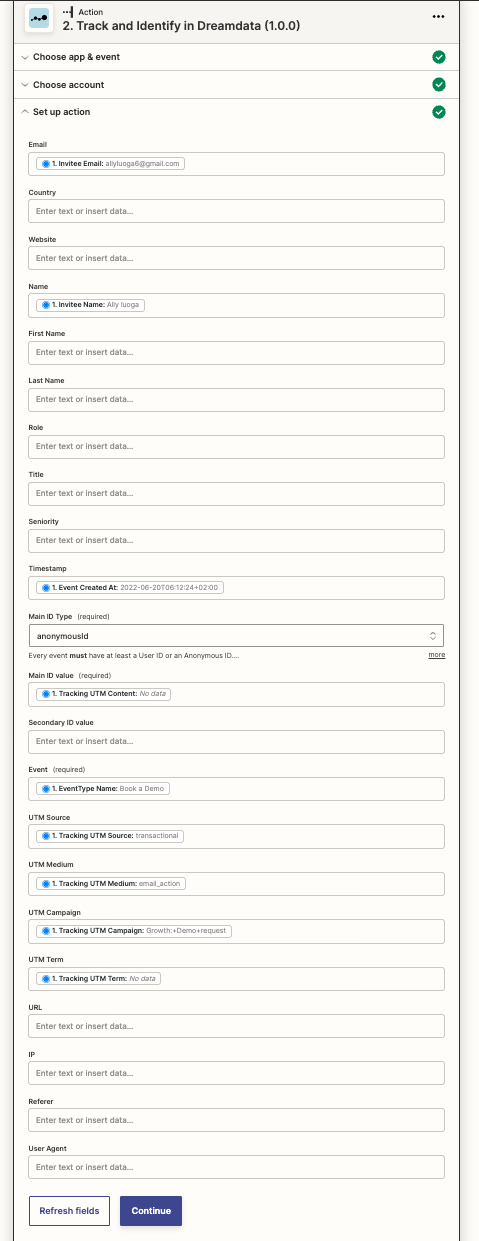
The next step is that you would want to pass any bookings made via Calendly to Dreamdata.
Here is an example of how you might want to do that using the Track & Identify method in the Dreamdata Zapier integration. In this example, it's assumed that utm_content contains the anonymous id.